
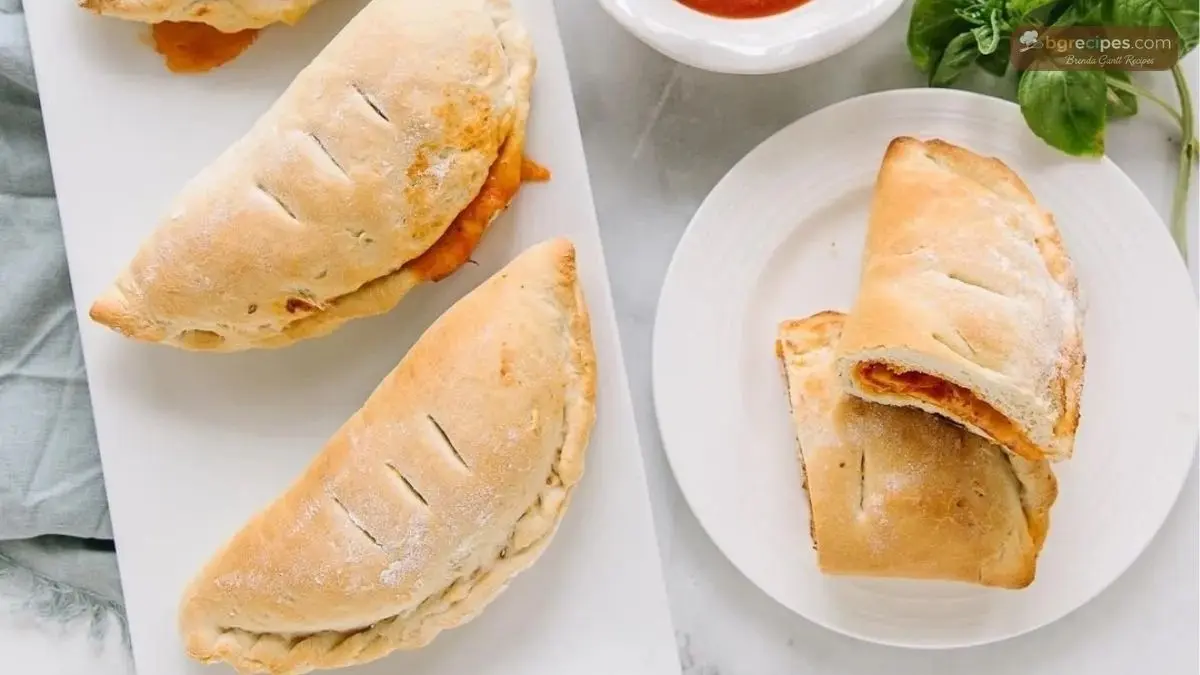
There’s something magical about transforming yesterday’s leftovers into today’s crispy, golden treasure. Brenda Gantt’s Homemade Hot Pockets are the Southern solution to food waste and hungry bellies alike.
This ingenious recipe uses leftover biscuit dough and whatever savory remnants hide in your fridge-vegetable soup, chili, shredded chicken, even rice and beans. Roll it paper-thin, stuff it generously, seal it tight, and fry until gloriously golden.
Whether you call them hand pies, fried pies, or hot pockets, these crispy pockets of comfort are about to become your new favorite way to repurpose leftovers into something extraordinary.
What Does It Taste Like?
Imagine biting through a shatteringly crisp, golden-brown crust that gives way to a steaming, savory center bursting with flavor. The homemade hot pockets deliver a perfect contrast-crunchy exterior meets tender filling.

Melted cheese mingles with seasoned leftovers, creating a rich, comforting bite that tastes nothing like store-bought versions. Each pocket carries the soul of Southern cooking: resourceful, flavorful, and made with love.
The fried biscuit dough becomes almost croissant-like in texture-flaky, buttery layers that shatter with each bite. It’s nostalgia wrapped in practicality, delivered piping hot.
Brenda Gantt’s Homemade Hot Pockets Recipe Ingredients
Ingredients (Makes 1 large or 2 smaller hot pockets – scale up as needed)
- Leftover biscuit dough (golf ball-sized or slightly larger per pocket)
- All-purpose or self-rising flour (for dusting and stiffening dough)
- Savory leftovers of choice (2-3 tablespoons per pocket) – vegetable soup, chili, shredded meat, rice with vegetables, chicken stew, or bean mixtures
- Grated cheese (1-2 tablespoons per pocket) – cheddar, Monterey Jack, or your favorite melting cheese
- Water (for sealing edges)
- Cooking oil or lard for frying (enough for ½-1 inch depth in skillet)
Kitchen Utensils
- Rolling pin
- Cast iron skillet or heavy-bottomed frying pan
- Slotted spatula or spider strainer
- Fork (for crimping edges)
- Sharp knife or pizza cutter
- Small bowl with water
- Paper towels for draining
- Clean work surface or pastry board
Preparation and Cooking Time
- Prep Time: 15 minutes
- Cooking Time: 4-5 minutes per batch
- Total Time: 20-25 minutes
- Servings: 1-2 hot pockets per person (easily scalable)
- Difficulty: Easy to Moderate
Copycat Brenda Gantt’s Homemade Hot Pockets Recipe
Step 1: Prepare Your Filling
Remove your cold leftovers from the refrigerator-Brenda loves using leftover vegetable-bean-chicken soup, but any savory mixture works beautifully. Measure 2-3 tablespoons of filling into a small bowl. Add 1-2 tablespoons of grated cheese and mix thoroughly. The cheese acts as a binder and adds richness. Set aside while you work with the dough.
Step 2: Condition the Biscuit Dough
If your leftover biscuit dough feels too soft or sticky, gradually work in additional flour, kneading gently until the dough becomes stiff enough to roll without sticking, yet remains pliable. This step is crucial for achieving that paper-thin consistency Brenda swears by.
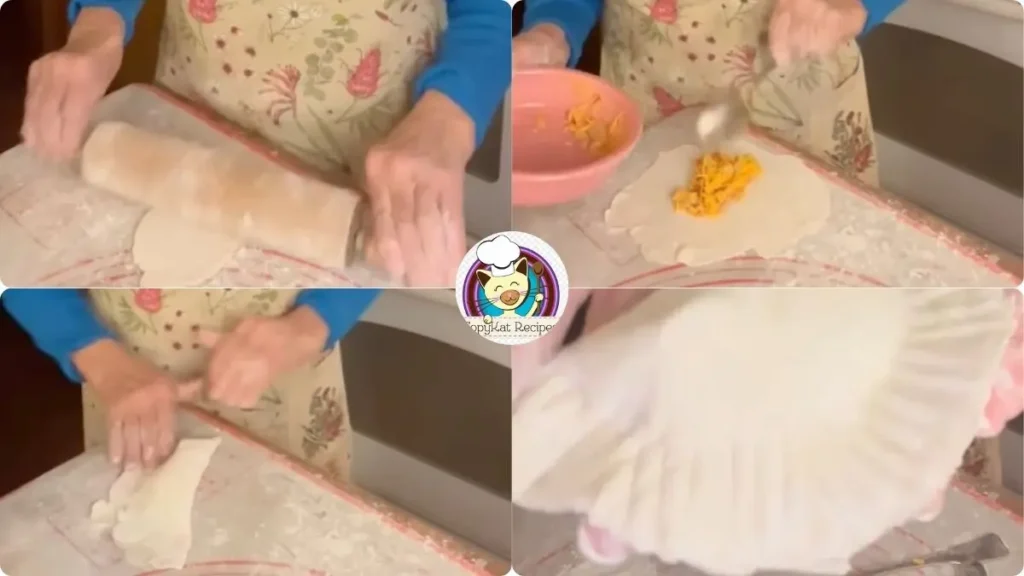
Step 3: Roll the Dough Paper-Thin
Generously flour your work surface. Take a golf ball-sized portion of dough (or slightly larger for heartier pockets) and begin rolling with steady, even pressure. Brenda emphasizes rolling the dough “paper thin”-you should nearly see through it when held up to light. This creates maximum crispiness when fried. The shape doesn’t need perfection; rustic rounds or ovals work beautifully.
Step 4: Add the Filling
Place your cheese-mixed filling directly in the center of the rolled dough circle. Resist overfilling-2-3 tablespoons is plenty. Too much filling causes bursting during frying and messy results.
Step 5: Seal with Water
Dip your fingertip into water and trace it around half the perimeter of the dough circle. This moisture creates the glue that holds your hot pocket together during the violent bubbling of hot oil.
Step 6: Fold and Crimp
Carefully fold the dough over the filling, creating a half-moon or semi-circle shape. Press the edges firmly together, starting from one end and working to the other, pushing out any air pockets as you go. Trim any irregular edges with a sharp knife or pizza cutter if desired-save those scraps for testing oil temperature. Dip a fork’s tines in flour to prevent sticking, then press firmly around the entire sealed edge, creating decorative crimps that also reinforce the seal.
Step 7: Heat the Frying Oil
Pour cooking oil or lard into your skillet to a depth of ½ to 1 inch. Heat over medium-high heat (Brenda uses setting 8 on her stovetop). Test readiness by dropping a small dough scrap into the oil-it should immediately sizzle vigorously and float to the surface.
Step 8: Adjust Temperature and Fry
Once the oil reaches proper temperature, reduce heat slightly to medium (around setting 7) to prevent the outside from browning before the inside heats through. Gently slide your prepared hot pocket into the hot oil using a slotted spatula. Fry for 1-2 minutes on the first side until deep golden brown, then carefully flip and fry the second side for another 1-2 minutes.
Step 9: Drain and Finish
Remove the fried hot pocket with your slotted spatula or spider strainer, allowing excess oil to drip back into the pan. Transfer to paper towels to drain. While still piping hot, sprinkle additional grated cheese over the top if desired-it will melt slightly into the crispy surface, adding an extra layer of flavor.
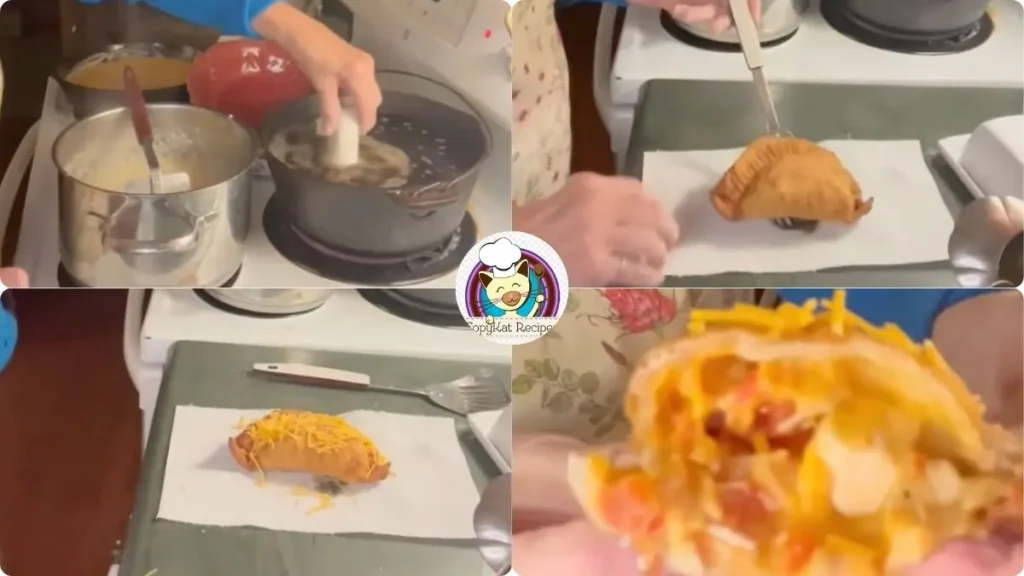
Step 10: Cool Briefly and Serve
Allow the hot pocket to rest for just 1-2 minutes before eating. The filling will be extremely hot-almost lava-like-so this brief cooling prevents burned mouths while maintaining that desirable crispy exterior.
7 Customization and Pairing Ideas for Serving
1. Breakfast Hot Pocket Variation
Transform this copycat Brenda Gantt’s homemade hot pockets recipe into a morning meal by filling with scrambled eggs, crumbled breakfast sausage, cheddar cheese, and a touch of hot sauce. Serve alongside country-style white gravy for dipping.
2. Pizza-Style Filling
Channel Italian-American flavors by filling your dough with marinara sauce, shredded mozzarella, diced pepperoni, and Italian seasoning. Be mindful not to make the sauce too liquid-pat the filling with paper towels if needed. Serve with additional warm marinara for dipping, creating a Southern-fried calzone experience that children and adults equally adore.
3. BBQ Pulled Pork Pocket
Leftover pulled pork finds new life when combined with sharp cheddar, a tablespoon of tangy BBQ sauce, and finely diced pickles. The vinegar in the pickles cuts through the richness of fried dough perfectly. Pair these smoky pockets with classic coleslaw and baked beans for a complete Southern barbecue plate that requires no utensils.
4. Tex-Mex Fiesta Pocket
Mix seasoned ground beef or shredded chicken with refried beans, pepper jack cheese, diced jalapeños, and cumin. After frying, serve these spicy homemade hot pockets with cooling accompaniments like sour cream, fresh pico de gallo, guacamole, and lime wedges.
5. Vegetarian Garden Pocket
Combine sautéed mushrooms, spinach, bell peppers, and onions with ricotta or feta cheese for a meat-free option bursting with vegetables. Season generously with garlic powder, black pepper, and herbs. Pair with a light mixed green salad dressed in lemon vinaigrette to balance the richness of the fried pastry.
6. Thanksgiving Leftover Special The day after Thanksgiving, stuff your dough with shredded turkey, stuffing, a spoonful of cranberry sauce, and a bit of gravy-moistened filling. These holiday pockets capture all the best flavors of Thanksgiving dinner in handheld form. Serve with extra warm gravy for dipping and watch leftovers disappear.

7 Essential Tips for Perfect Hot Pockets
Tip 1: Master the Paper-Thin Roll
The single most important technique in this homemade hot pockets recipe is achieving Brenda’s signature paper-thin dough. Many home cooks roll their dough too thick, resulting in doughy, undercooked centers or tough crusts. Work on a generously floured surface and apply steady, even pressure with your rolling pin. Rotate the dough frequently, always rolling from the center outward.
Tip 2: Control Your Filling Moisture
The enemy of crispy hot pockets is excess liquid. When using soup, stew, or saucy leftovers, drain away excess broth before mixing with cheese. If your filling seems particularly wet, mix in a tablespoon of breadcrumbs or crushed crackers to absorb moisture. Pat meat fillings with paper towels before adding.
Tip 3: Temperature Matters Immensely
Oil temperature separates spectacular hot pockets from greasy disappointments. Too cool, and your pockets absorb oil, becoming heavy and greasy. Too hot, and the exterior burns while the interior remains cold. Invest in an instant-read thermometer if possible-ideal frying temperature sits between 350-365°F (175-185°C).
Tip 4: Seal Like Your Meal Depends On It (Because It Does)
A weak seal guarantees filling eruption and oil-contaminated interiors. After moistening edges with water, press firmly with your fingers to create initial contact, then reinforce with fork crimps. Start at one corner and work methodically around the entire edge, ensuring no gaps exist.
Storage and Reheating Guidance
Store cooled hot pockets in an airtight container in the refrigerator for up to 3 days. Reheat in a 375°F oven or air fryer for 8-10 minutes until crispy and heated through-avoid microwaving as it makes the crust soggy and rubbery.
Common Queries and FAQs
Can I use store-bought dough instead of leftover biscuit dough?
Absolutely! Refrigerated biscuit dough, pie crust, or even pizza dough works wonderfully for these homemade hot pockets. The key is rolling whatever dough you choose paper-thin for optimal crispiness. Store-bought pie crust is particularly successful since it’s already formulated for rolling thin and contains enough fat for flaky layers.
What if I don’t have any leftover biscuit dough?
Make a simple biscuit dough specifically for this purpose, or use alternatives like crescent roll dough, puff pastry (though it’s richer), or even tortilla dough rolled thin. You can also make a basic dough by mixing 2 cups self-rising flour with ⅓ cup cold butter and ¾ cup milk, kneading just until combined.
Can these be baked instead of fried?
Yes, though the texture differs significantly. Brush assembled pockets with melted butter or egg wash, place on a parchment-lined baking sheet, and bake at 400°F for 15-18 minutes until golden brown. Baked versions won’t achieve the same shattering crispiness as fried but remain delicious and substantially lighter in calories.
Why did my hot pocket explode while frying?
Explosions typically result from inadequate sealing, overfilling, or oil that’s too hot causing rapid steam buildup. Ensure you’re crimping edges thoroughly with a fork, leaving a generous ½-inch sealed border, and not overstuffing. Also verify your oil temperature isn’t exceeding 375°F.
What other fillings work well in this recipe?
Nearly any savory filling succeeds: taco meat with beans, ham and cheese, chicken pot pie filling, sausage gravy, mashed potatoes with bacon, scrambled eggs with vegetables, even macaroni and cheese. The rule of thumb: if it tastes good cold or room temperature and isn’t too liquidy, it’ll work beautifully as a hot pocket filling.
How do I know when the hot pocket is done frying?
Visual cues are your best guide. The exterior should achieve a deep golden-brown color-not pale yellow (undercooked) or dark mahogany (overcooked). The pocket should sound hollow when tapped gently with tongs. Most cook through in 3-4 minutes total (1.5-2 minutes per side). If you’re uncertain, sacrifice one pocket by cutting it open to check that the filling is steaming hot throughout.
Can I make these ahead for a party or gathering?
Definitely! Fry them completely, let cool, then reheat just before serving in a 350°F oven for about 10 minutes. Alternatively, assemble them completely but don’t fry, refrigerate for up to 24 hours, then fry fresh when guests arrive. The make-ahead flexibility makes this copycat Brenda Gantt’s homemade hot pockets recipe perfect for entertaining while maintaining that just-fried quality.
Brenda Gantt’s Homemade Hot Pockets Recipe
Ingredients
Equipment
Method
- Remove your cold leftovers from the refrigerator-Brenda loves using leftover vegetable-bean-chicken soup, but any savory mixture works beautifully. Measure 2-3 tablespoons of filling into a small bowl. Add 1-2 tablespoons of grated cheese and mix thoroughly. The cheese acts as a binder and adds richness. Set aside while you work with the dough.
- If your leftover biscuit dough feels too soft or sticky, gradually work in additional flour, kneading gently until the dough becomes stiff enough to roll without sticking, yet remains pliable. This step is crucial for achieving that paper-thin consistency Brenda swears by.
- Generously flour your work surface. Take a golf ball-sized portion of dough (or slightly larger for heartier pockets) and begin rolling with steady, even pressure. Brenda emphasizes rolling the dough “paper thin”-you should nearly see through it when held up to light. This creates maximum crispiness when fried. The shape doesn’t need perfection; rustic rounds or ovals work beautifully.
- Place your cheese-mixed filling directly in the center of the rolled dough circle. Resist overfilling-2-3 tablespoons is plenty. Too much filling causes bursting during frying and messy results.
- Dip your fingertip into water and trace it around half the perimeter of the dough circle. This moisture creates the glue that holds your hot pocket together during the violent bubbling of hot oil.
- Carefully fold the dough over the filling, creating a half-moon or semi-circle shape. Press the edges firmly together, starting from one end and working to the other, pushing out any air pockets as you go. Trim any irregular edges with a sharp knife or pizza cutter if desired-save those scraps for testing oil temperature. Dip a fork’s tines in flour to prevent sticking, then press firmly around the entire sealed edge, creating decorative crimps that also reinforce the seal.
- Pour cooking oil or lard into your skillet to a depth of ½ to 1 inch. Heat over medium-high heat (Brenda uses setting 8 on her stovetop). Test readiness by dropping a small dough scrap into the oil-it should immediately sizzle vigorously and float to the surface.
- Once the oil reaches proper temperature, reduce heat slightly to medium (around setting 7) to prevent the outside from browning before the inside heats through. Gently slide your prepared hot pocket into the hot oil using a slotted spatula. Fry for 1-2 minutes on the first side until deep golden brown, then carefully flip and fry the second side for another 1-2 minutes.
- Remove the fried hot pocket with your slotted spatula or spider strainer, allowing excess oil to drip back into the pan. Transfer to paper towels to drain. While still piping hot, sprinkle additional grated cheese over the top if desired-it will melt slightly into the crispy surface, adding an extra layer of flavor.
- Allow the hot pocket to rest for just 1-2 minutes before eating. The filling will be extremely hot-almost lava-like-so this brief cooling prevents burned mouths while maintaining that desirable crispy exterior.
Video
Notes
Brenda Gantt’s Homemade Hot Pockets represent the beautiful intersection of Southern resourcefulness and comfort food satisfaction. This recipe transforms humble leftovers and yesterday’s biscuit dough into golden, crispy packets of pure deliciousness that rival anything from a commercial kitchen.
The technique is straightforward, the ingredients infinitely flexible, and the results consistently spectacular. Whether you’re feeding hungry kids after school, using up fridge remnants, or simply craving something crispy and savory, these hot pockets deliver every time.
Embrace Brenda’s waste-nothing wisdom and discover why generations of Southern cooks have relied on fried hand pies to stretch meals and delight families.
Additionally, You can also like and, follow us on Pinterest, and YouTube for more updates. Your thoughts and engagement are greatly appreciated!
Thanks for recipe yooo
Welcome kane