
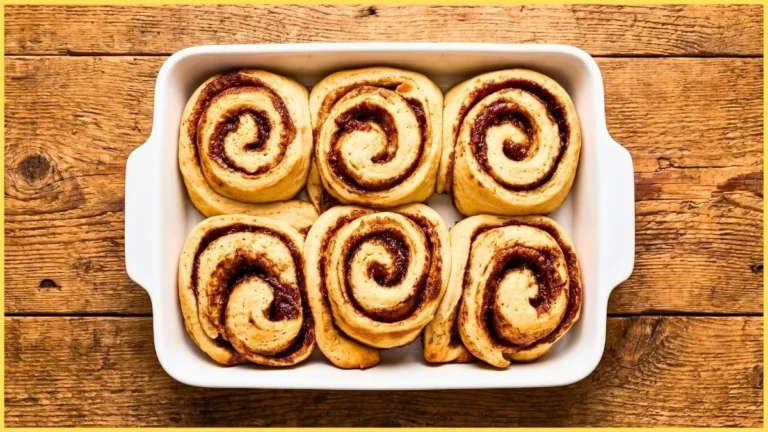

There is something special about a cinnamon roll that is soft enough to pull apart with your fingers, but still has those distinct spirals of cinnamon and brown sugar in every bite. That is exactly what I am looking for when I make this Mama Llama Bakery Cinnamon Roll Recipe.
What sets this style apart is the texture. Instead of making a stiff, heavily floured dough, I keep the dough soft and slightly tacky. The combination of Greek yogurt, eggs, oil, and slow-added butter gives the yeast rolls a tender, rich crumb, while the brown sugar filling creates that gooey center everyone reaches for.
I also love the caramelized bottom in this recipe. The rolls sit directly over a mixture of butter, brown sugar, and real maple syrup, so the bottoms become sticky and deeply flavorful as they bake. Then I finish the warm rolls with a toasted vanilla-style glaze that melts into the spirals.
This is a Mama Llama Bakery-inspired cinnamon roll recipe, designed around the characteristics that make this style of bakery cinnamon roll so appealing: soft dough, generous cinnamon layers, a gooey center, caramelized bottom, and plenty of glaze.
Why This Mama Llama Bakery Cinnamon Roll Recipe Is Different
The biggest difference is the dough. It is intentionally softer and more hydrated than many traditional cinnamon roll doughs. That means you may look at it during mixing and think it needs more flour, but adding too much flour is one of the easiest ways to lose that soft bakery-style texture.
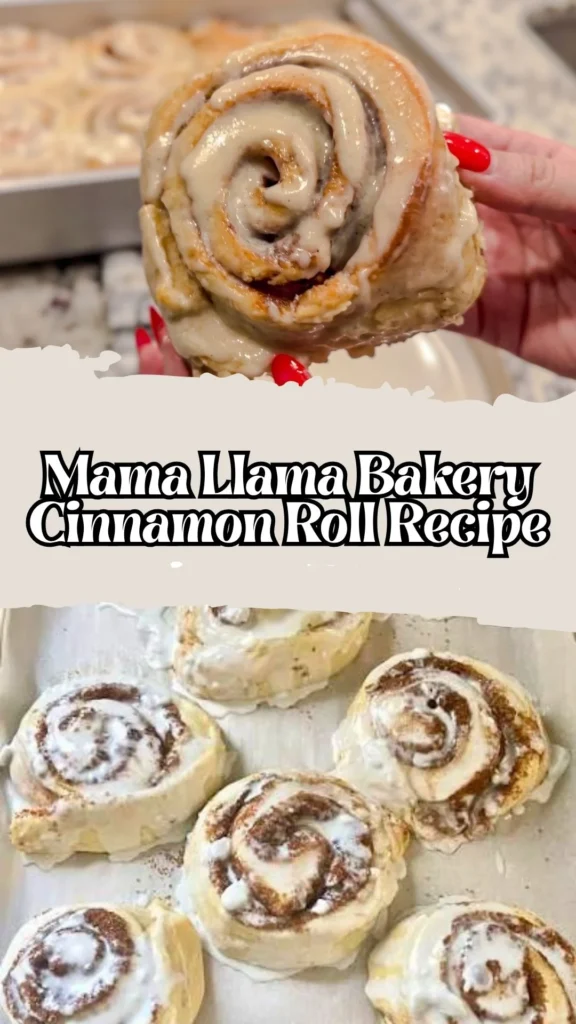
Greek yogurt contributes tenderness while the eggs add richness and structure. Avocado oil keeps the dough supple, and butter is incorporated gradually during kneading rather than being mixed in all at once.
The recipe also uses a short rest before the baking powder and baking soda are added. I would not skip this step. It gives the dough time to relax before those leavening ingredients go in.
Another defining feature is the caramel bottom. Instead of placing the rolls into a dry pan, I spread a butter, brown sugar, and maple syrup mixture underneath them. As the rolls bake, that mixture turns into a sticky caramel-like layer.
And finally, the rolls are glazed while they are still warm. The glaze softens from the heat and settles into the ridges of the cinnamon rolls instead of sitting as a thick layer only on top.
Ingredients for Mama Llama Bakery Cinnamon Roll Recipe
360 ml warm milk (105–110°F / 40–43°C): Warm milk gives the yeast the right environment to activate without overheating it. I use a thermometer when possible because milk that is too hot can damage the yeast.
100 g sugar for the yeast bloom: This gives the yeast a readily available source of sugar while it activates.
120 g sugar for the dough: This adds sweetness to the dough itself without making the filling responsible for all of the sweetness.
15–16 g active dry yeast: Active dry yeast provides the rise needed for tall, fluffy cinnamon rolls.
240 g Greek yogurt: Fat-free Fage is my preferred choice because it gives the dough tenderness without making it excessively heavy. Chobani vanilla can also work if that is what you have, although the vanilla version will add another layer of flavor.
2 large eggs + 1 egg yolk: The eggs contribute richness, color, structure, and tenderness. The extra yolk makes the dough especially soft.
1 tsp vanilla extract: A little vanilla in the dough makes the cinnamon flavor taste warmer and more rounded.
100 g avocado oil: Avocado oil keeps the dough tender and flexible. A neutral oil can be substituted if needed.
1080 g bread flour: Bread flour provides enough gluten-forming protein to give the rolls structure. Hold back about 50 g initially because you may not need all of it.
2 tsp salt: Salt balances the sweetness and keeps the finished rolls from tasting flat.
2 tsp baking powder: This provides additional lift and is added after the dough’s initial rest.
1 tsp baking soda: Baking soda works alongside the other ingredients to contribute to the final texture and rise.
113 g room-temperature butter: Soft butter is incorporated gradually during kneading. Adding it slowly helps the dough develop structure instead of becoming greasy.
For the Cinnamon Filling
226 g softened butter: Soft butter spreads easily across the dough without tearing it.
400 g brown sugar: Brown sugar gives the filling its deep caramel flavor and helps create a moist, gooey center.
4 tbsp ground cinnamon: This is the main spice in the filling, so use fresh, aromatic cinnamon if possible.
2 tsp vanilla extract: Vanilla rounds out the brown sugar and cinnamon.
For the Caramel Bottom
90 g melted butter: Butter creates the rich foundation of the caramel layer.
160 g packed brown sugar: Brown sugar melts with the butter and creates the sticky caramelized coating beneath the rolls.
35 g real maple syrup: Maple syrup adds moisture, sweetness, and a subtle maple flavor.
⅜ tsp fine salt: Salt keeps the caramel from becoming one-dimensional and overly sweet.
¼ tsp vanilla bean paste, optional: A small amount adds extra vanilla aroma to the caramel layer.
For the Toasted Vanilla-Style Glaze
113 g room-temperature butter: Soft butter makes the glaze smooth and easy to whip.
240–300 g powdered sugar: Start with the lower amount and add more until the glaze reaches the consistency you want.
15–30 g milk or heavy cream: Use less for a thicker glaze and more for a pourable glaze.
3 g vanilla bean paste: Vanilla bean paste gives the glaze a more pronounced vanilla flavor.
2–3 g cream cheese or cheesecake extract: This adds a subtle tangy cheesecake-like flavor. You can substitute a small amount of softened cream cheese if preferred.
1 tbsp maple syrup: Maple syrup adds depth without making the glaze taste strongly of maple.
1 tbsp cooled coffee: A small amount of cooled coffee gives the glaze a deeper, toasted flavor rather than making it taste like coffee.
Pinch of fine sea salt: Salt balances the powdered sugar and makes the vanilla and maple flavors stand out.
How to Make Mama Llama Bakery Cinnamon Rolls
Bloom the yeast: Warm the milk to 105–110°F (40–43°C), then stir in the 100 g sugar. Sprinkle the active dry yeast over the surface and let it sit for 5–10 minutes. The mixture should become visibly foamy. If there is little or no activity after about 10 minutes, check the milk temperature and yeast freshness before continuing.
Mix the soft dough: Add most of the bread flour to the yeast mixture along with the Greek yogurt, eggs, egg yolk, vanilla, avocado oil, remaining 120 g sugar, and salt. Begin mixing and kneading until the ingredients form a dough. Add the reserved flour only if necessary. The finished dough should feel soft and slightly tacky rather than dry and stiff.
Develop the dough before adding the butter: Knead the dough until it begins to develop elasticity. Then add the 113 g room-temperature butter in small chunks, allowing each addition to become incorporated before adding more. This gradual addition is important because adding all of the butter at once can make the dough slippery and difficult to develop.
Check the dough instead of adding flour automatically: Pick up a small piece of dough and stretch it gently. A well-developed dough should stretch rather than immediately tear. If the dough is soft and slightly tacky but holds together, resist the temptation to keep adding flour. A stiff dough can produce dense cinnamon rolls.
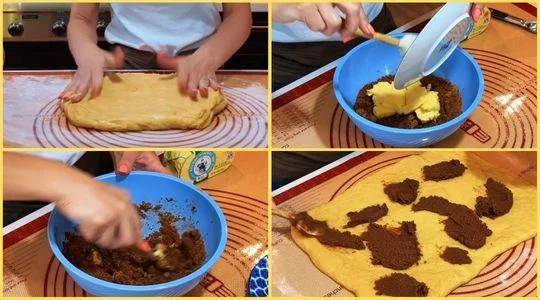
Rest the dough for 20 minutes: Cover the dough and let it rest for approximately 20 minutes. This short pause gives the gluten time to relax and makes the dough easier to work with.
Add the baking powder and baking soda: After the 20-minute rest, mix in the baking powder and baking soda until they are evenly distributed. Adding them at this point is an important part of the method, so don’t mix them into the flour at the beginning.
Let the dough rise: Cover the dough and allow it to rise for about 45–60 minutes. Instead of depending entirely on the clock, look at the dough. It should become noticeably lighter, puffier, and larger. A warm kitchen may shorten the rising time, while a cool kitchen may require more time.
Prepare the cinnamon filling: Combine the softened butter, brown sugar, cinnamon, and vanilla until you have a spreadable mixture. The butter should be soft enough to spread without pulling or tearing the dough.
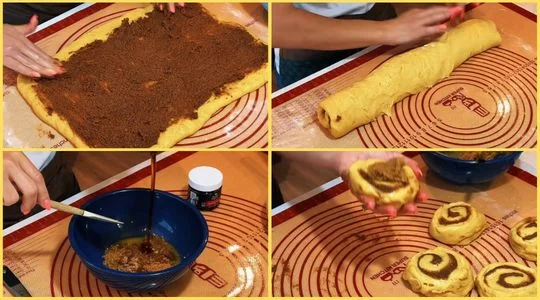
Roll the dough into a rectangle: Turn the risen dough onto a lightly floured surface and gently roll it into a large rectangle. If you want more visible layers and a greater number of rolls, roll the dough thinner. Avoid adding large amounts of flour to the work surface because excess flour can make the finished rolls less tender.
Spread the filling evenly: Spread the cinnamon-butter mixture over the entire rectangle, working as evenly as possible. A consistent layer of filling helps every roll have cinnamon flavor from the outer layers through the center.
Roll the dough into a tight log: Starting from one long edge, roll the dough into a log. Keep the roll firm enough to create defined spirals, but do not compress the dough so aggressively that you squeeze the filling out.
Let the dough relax if it springs back: If the dough repeatedly shrinks while you roll it, stop fighting it. Cover it and let it rest for another 5–10 minutes. The gluten needs time to relax, and the dough will usually become much easier to roll afterward.
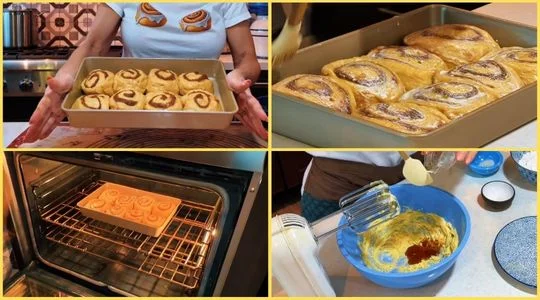
Cut the center-bite style rolls: Cut the log into thick, even pieces. Try to keep the pieces similar in size so they proof and bake at approximately the same rate. Thick pieces help create the substantial, soft centers that make this style of cinnamon roll so satisfying.
Make the caramel bottom: Stir together the melted butter, packed brown sugar, maple syrup, salt, and optional vanilla bean paste. Mix until evenly combined.
Prepare the baking pan: Spread the caramel mixture across the bottom of your baking pan or pans. Try to distribute it evenly so the rolls have a consistent caramelized base after baking.
Arrange the cinnamon rolls: Place the cut rolls over the caramel mixture, leaving enough room between them for expansion. They should eventually become pleasantly snug as they proof and bake.
Proof the shaped rolls: Let the rolls proof for about 25–30 minutes, or until they look noticeably puffed. The exact time depends on the temperature of your kitchen. Properly proofed rolls should feel light and airy rather than dense.
Bake in two stages: Bake the rolls at 375°F (190°C) for 10 minutes. Then reduce the oven temperature to 350°F (175°C) and continue baking for approximately 20 minutes, or until the rolls are fully cooked. The two-stage bake helps develop color and caramelization while allowing the centers to finish cooking without relying on an excessively high temperature for the entire bake.
Check the center before removing the rolls: The tops should be golden and the centers should no longer look like wet, raw dough. If the tops are becoming too dark before the centers are finished, loosely tent the pan with foil and continue baking.
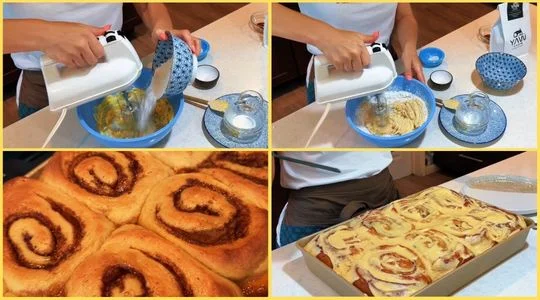
Make the toasted vanilla glaze: Beat the room-temperature butter until smooth. Gradually add the powdered sugar, then mix in the milk or cream, vanilla bean paste, cream cheese or cheesecake extract, maple syrup, cooled coffee, and sea salt. Adjust the powdered sugar or milk until the glaze is thick but spreadable.
Glaze the warm cinnamon rolls: Let the baked rolls cool briefly, but don’t wait until they are completely cold. Spread the glaze over the warm rolls and allow it to melt slightly into the spirals. This is when the glaze becomes part of the cinnamon roll rather than simply sitting on top.
How to Get the Softest Mama Llama-Style Cinnamon Rolls
The most important thing I can tell you is don’t chase a perfectly dry dough. Cinnamon roll dough does not need to feel like pizza dough. A soft, slightly tacky dough is what helps produce a tender interior after baking.
If your dough feels wet but is becoming elastic as you knead, give it more mixing time before reaching for more flour. Flour absorption varies between brands, and humidity can also change how much flour the dough needs.
The reserved flour is there for a reason. Start with most of the measured flour and add the remaining amount only when the dough genuinely needs it. You can always add a little more flour; removing excess flour from a stiff dough is much harder.
Another important detail is the butter. Adding the butter slowly allows the dough to absorb the fat while continuing to build gluten structure. If you add a large amount of butter too early, the dough can become greasy and difficult to develop.
Why the Dough Uses Greek Yogurt
Greek yogurt is more than a flavor ingredient in these cinnamon rolls. It helps create a tender dough while also contributing moisture and body.
I prefer fat-free Fage for this recipe because it gives the dough a thick yogurt base without adding a lot of extra fat. If you use vanilla Greek yogurt, remember that it will slightly change the sweetness and vanilla profile.
The important thing is consistency. If you substitute a much thinner yogurt, you may need to adjust the flour slightly because the dough’s hydration will change.
Why You Shouldn’t Add All the Flour at Once
This is one of those small baking decisions that can make a surprisingly large difference.
The recipe calls for 1080 g of bread flour, but I recommend holding back approximately 50 g. The reason is simple: the dough tells you how much flour it needs.
A properly mixed cinnamon roll dough should be soft and slightly tacky. If you add every gram of flour simply because the recipe lists that amount, you may end up with a stiff dough. Stiff dough generally means tougher, denser rolls.
Add the reserved flour gradually only when the dough remains excessively loose and cannot develop structure.
How to Know When Cinnamon Roll Dough Is Ready
Don’t use only the timer to decide whether your dough is ready.
During kneading, look for a dough that becomes smoother and more elastic. A small piece should stretch when gently pulled instead of immediately breaking apart.
During the first rise, the dough should become noticeably puffy and expanded.
After shaping, the rolls should look lighter and fuller. If you gently press one, it should have some spring without feeling completely firm.
These visual and tactile signs are more reliable than following a rising time blindly because yeast activity changes with room temperature.
Why Your Cinnamon Rolls May Not Be Gooey
If your cinnamon rolls are dry instead of gooey, overbaking is one of the first things I would check. Cinnamon rolls continue cooking from residual heat after they leave the oven, so you don’t want to leave them in until they look completely dry.
Too much flour can also be responsible. A stiff dough has less moisture available to create a soft interior.
The filling matters too. Make sure the softened butter, brown sugar, and cinnamon dip are spread evenly so every spiral has enough filling.
Finally, don’t let the rolls sit uncovered for a long time after baking. Glazing them while they are still warm helps preserve the soft texture and adds moisture to the surface.
What to Do If Your Dough Springs Back While Rolling
If the dough keeps shrinking after you roll it, the gluten is probably too tight.
Don’t keep rolling harder. Cover the dough and let it rest for 5–10 minutes. Then try again.
This short rest gives the gluten time to relax. In my experience, it is much easier to work with a rested dough than one that is being forced into shape.
This trick is especially useful when you’re trying to roll the dough thin enough to create plenty of cinnamon layers.
Same-Day or Overnight Cinnamon Rolls?
These rolls can fit either schedule.
For a same-day batch, complete the first rise, roll and shape the dough, proof the rolls, and bake them once they are properly puffed.
For an overnight approach, the shaped dough can be prepared ahead and refrigerated, then brought back toward room temperature and allowed to finish proofing before baking. The important part is not to rush the final proof simply because you are working from a schedule.
A cold dough will behave differently from dough that has been sitting in a warm kitchen. Watch the rolls rather than assuming they will take exactly the same amount of time every time you make them.
How to Prevent the Caramel Bottom From Burning
The caramel mixture contains butter and sugar, so it needs enough heat to become deeply flavorful without being pushed too far.
That is one reason I like the two-stage baking method. The rolls receive a short period at 375°F before the oven is reduced to 350°F.
If your particular oven runs hot, start checking the rolls earlier. A dark metal pan can also brown the bottom faster than a lighter-colored baking dish.
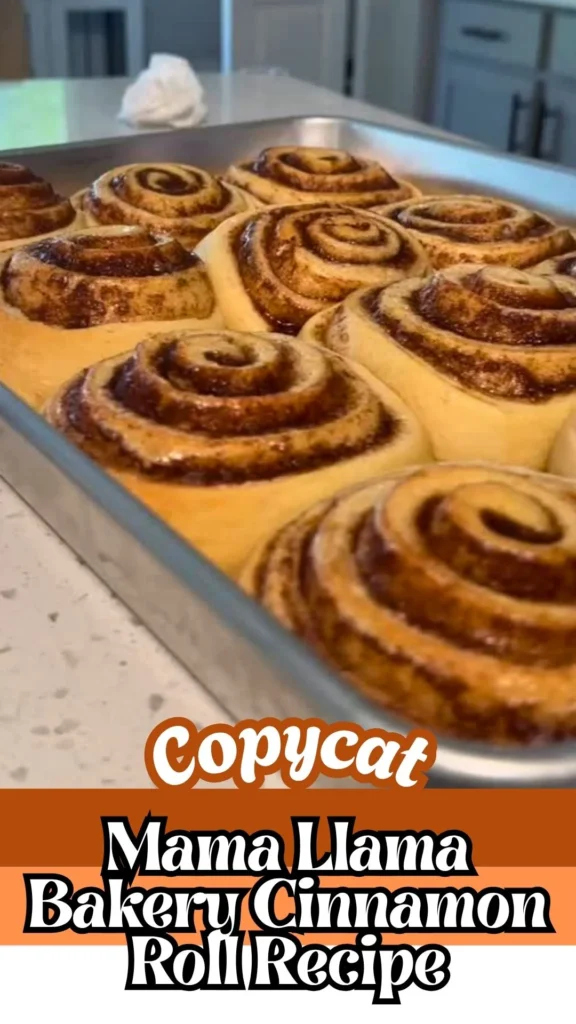
The goal is a rich, sticky caramelized bottom-not bitter, scorched sugar.
How to Make the Toasted Vanilla Glaze Taste Better
The glaze has several small ingredients that work together rather than competing for attention.
Vanilla bean paste provides the main vanilla flavor. Maple syrup adds a subtle caramel-like sweetness, while cooled coffee gives the glaze a deeper toasted note.
The coffee should be cooled before adding it. Hot coffee can soften the butter too much and make the glaze loose.
Start with 240 g powdered sugar and increase toward 300 g if the glaze needs more body. If it becomes too thick, add milk or cream a little at a time.
A small pinch of salt is also worth keeping. Without it, powdered-sugar glazes can taste overwhelmingly sweet.
Can I Use Regular Oil Instead of Avocado Oil?
Yes. A neutral-tasting oil can replace avocado oil in the same general amount.
Choose an oil without a strong flavor so it doesn’t compete with the cinnamon, vanilla, brown sugar, and maple. The purpose of the oil here is primarily to contribute tenderness and keep the dough supple.
Can I Use All-Purpose Flour?
You can, but bread flour is the better choice for this particular dough.
Bread flour provides stronger gluten development, which helps the dough hold its structure through kneading, rising, rolling, shaping, and baking.
If you use all-purpose flour, avoid automatically adding extra flour to compensate for a softer dough. The finished dough should still be soft and slightly tacky.
Can I Make These Cinnamon Rolls Without the Caramel Bottom?
Yes, but the finished rolls will be different.
The caramel bottom contributes buttery sweetness and creates the sticky underside that makes this recipe distinctive. Without it, you’ll still have cinnamon rolls, but you won’t get the same caramelized base.
If you prefer a less sweet roll, you can make the rolls without the caramel layer and simply bake them in a prepared pan.
How to Store Mama Llama-Style Cinnamon Rolls
Store completely cooled cinnamon rolls in an airtight container. Because the glaze and filling contain dairy and butter, refrigerate them if you need to keep them for longer than a short period.
For the best texture, warm individual rolls gently before serving. A short microwave warming is convenient, while a low oven works well when reheating several rolls at once.
Avoid overheating them. Too much heat can dry the dough and turn the soft center chewy.
Can You Freeze Cinnamon Rolls?
Yes. Cinnamon rolls can be frozen for longer storage when properly wrapped.
For the best quality, wrap them tightly so they are protected from freezer air. Thaw them gradually, then warm them gently before serving.
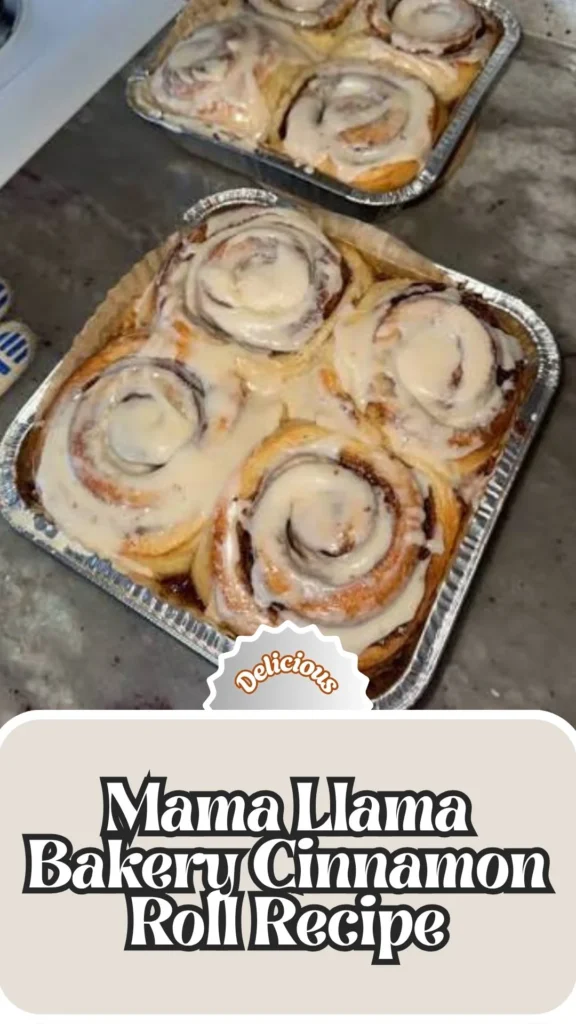
If possible, add fresh glaze after reheating rather than freezing a heavily glazed batch. The fresh glaze will give the rolls a softer, more bakery-style finish.
My Biggest Mistakes to Avoid
Adding too much flour: This is probably the easiest mistake to make. A soft, slightly tacky dough is preferable to a stiff one.
Adding the butter too quickly: Incorporate the butter gradually during kneading so the dough has time to absorb it.
Skipping the 20-minute rest: The rest comes before the baking powder and baking soda for a reason. Keep that sequence intact.
Rolling dough that keeps shrinking: Give it 5–10 minutes to relax instead of forcing it.
Under-proofing the shaped rolls: The rolls need to become visibly puffy before baking.
Overbaking: A cinnamon roll can look beautifully browned on top while still needing a little time in the center. Use the appearance and texture of the middle as your guide.
Glazing cold rolls: Warm rolls allow the glaze to melt into the layers and create that soft, gooey finish.
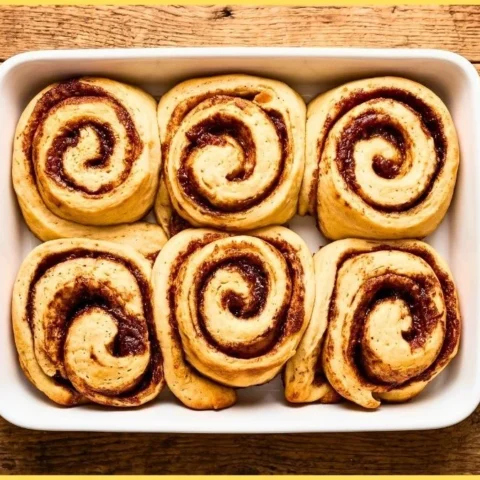
Mama Llama Bakery Cinnamon Roll Recipe
There is something special about a cinnamon roll that is soft enough to pull apart with your fingers, but still has those distinct spirals of cinnamon and brown sugar in every bite. That is exactly what I am looking for when I make this Mama Llama Bakery Cinnamon Roll Recipe.
Ingredients
- 360 ml warm milk
- 100 g sugar for the yeast bloom
- 120 g sugar for the dough
- 15–16 g active dry yeast
- 240 g Greek yogurt
- 2 large eggs + 1 egg yolk
- 1 tsp vanilla extract
- 100 g avocado oil
- 1080 g bread flour
- 2 tsp salt
- 2 tsp baking powder
- 1 tsp baking soda
- 113 g room-temperature butter
- 226 g softened butter
- 400 g brown sugar
- 4 tbsp ground cinnamon
- 2 tsp vanilla extract
- 90 g melted butter
- 160 g packed brown sugar
- 35 g real maple syrup
- ⅜ tsp fine salt
- ¼ tsp vanilla bean paste
- 113 g room-temperature butter
- 240–300 g powdered sugar
- 15–30 g milk or heavy cream
- 3 g vanilla bean paste
- 2–3 g cream cheese or cheesecake extract
- 1 tbsp maple syrup
- 1 tbsp cooled coffee
- Pinch of fine sea salt
Instructions
- Bloom the yeast: Warm the milk to 105–110°F (40–43°C), then stir in the 100 g sugar. Sprinkle the active dry yeast over the surface and let it sit for 5–10 minutes. The mixture should become visibly foamy. If there is little or no activity after about 10 minutes, check the milk temperature and yeast freshness before continuing.
- Mix the soft dough: Add most of the bread flour to the yeast mixture along with the Greek yogurt, eggs, egg yolk, vanilla, avocado oil, remaining 120 g sugar, and salt. Begin mixing and kneading until the ingredients form a dough. Add the reserved flour only if necessary. The finished dough should feel soft and slightly tacky rather than dry and stiff.
- Develop the dough before adding the butter: Knead the dough until it begins to develop elasticity. Then add the 113 g room-temperature butter in small chunks, allowing each addition to become incorporated before adding more. This gradual addition is important because adding all of the butter at once can make the dough slippery and difficult to develop.
- Check the dough instead of adding flour automatically: Pick up a small piece of dough and stretch it gently. A well-developed dough should stretch rather than immediately tear. If the dough is soft and slightly tacky but holds together, resist the temptation to keep adding flour. A stiff dough can produce dense cinnamon rolls.
- Rest the dough for 20 minutes: Cover the dough and let it rest for approximately 20 minutes. This short pause gives the gluten time to relax and makes the dough easier to work with.
- Add the baking powder and baking soda: After the 20-minute rest, mix in the baking powder and baking soda until they are evenly distributed. Adding them at this point is an important part of the method, so don’t mix them into the flour at the beginning.
- Let the dough rise: Cover the dough and allow it to rise for about 45–60 minutes. Instead of depending entirely on the clock, look at the dough. It should become noticeably lighter, puffier, and larger. A warm kitchen may shorten the rising time, while a cool kitchen may require more time.
- Prepare the cinnamon filling: Combine the softened butter, brown sugar, cinnamon, and vanilla until you have a spreadable mixture. The butter should be soft enough to spread without pulling or tearing the dough.
- Roll the dough into a rectangle: Turn the risen dough onto a lightly floured surface and gently roll it into a large rectangle. If you want more visible layers and a greater number of rolls, roll the dough thinner. Avoid adding large amounts of flour to the work surface because excess flour can make the finished rolls less tender.
- Spread the filling evenly: Spread the cinnamon-butter mixture over the entire rectangle, working as evenly as possible. A consistent layer of filling helps every roll have cinnamon flavor from the outer layers through the center.
- Roll the dough into a tight log: Starting from one long edge, roll the dough into a log. Keep the roll firm enough to create defined spirals, but do not compress the dough so aggressively that you squeeze the filling out.
- Let the dough relax if it springs back: If the dough repeatedly shrinks while you roll it, stop fighting it. Cover it and let it rest for another 5–10 minutes. The gluten needs time to relax, and the dough will usually become much easier to roll afterward.
- Cut the center-bite style rolls: Cut the log into thick, even pieces. Try to keep the pieces similar in size so they proof and bake at approximately the same rate. Thick pieces help create the substantial, soft centers that make this style of cinnamon roll so satisfying.
- Make the caramel bottom: Stir together the melted butter, packed brown sugar, maple syrup, salt, and optional vanilla bean paste. Mix until evenly combined.
- Prepare the baking pan: Spread the caramel mixture across the bottom of your baking pan or pans. Try to distribute it evenly so the rolls have a consistent caramelized base after baking.
- Arrange the cinnamon rolls: Place the cut rolls over the caramel mixture, leaving enough room between them for expansion. They should eventually become pleasantly snug as they proof and bake.
- Proof the shaped rolls: Let the rolls proof for about 25–30 minutes, or until they look noticeably puffed. The exact time depends on the temperature of your kitchen. Properly proofed rolls should feel light and airy rather than dense.
- Bake in two stages: Bake the rolls at 375°F (190°C) for 10 minutes. Then reduce the oven temperature to 350°F (175°C) and continue baking for approximately 20 minutes, or until the rolls are fully cooked. The two-stage bake helps develop color and caramelization while allowing the centers to finish cooking without relying on an excessively high temperature for the entire bake.
- Check the center before removing the rolls: The tops should be golden and the centers should no longer look like wet, raw dough. If the tops are becoming too dark before the centers are finished, loosely tent the pan with foil and continue baking.
- Make the toasted vanilla glaze: Beat the room-temperature butter until smooth. Gradually add the powdered sugar, then mix in the milk or cream, vanilla bean paste, cream cheese or cheesecake extract, maple syrup, cooled coffee, and sea salt. Adjust the powdered sugar or milk until the glaze is thick but spreadable.
- Glaze the warm cinnamon rolls: Let the baked rolls cool briefly, but don’t wait until they are completely cold. Spread the glaze over the warm rolls and allow it to melt slightly into the spirals. This is when the glaze becomes part of the cinnamon roll rather than simply sitting on top.
Notes
Store completely cooled cinnamon rolls in an airtight container. Because the glaze and filling contain dairy and butter, refrigerate them if you need to keep them for longer than a short period. For the best texture, warm individual rolls gently before serving. A short microwave warming is convenient, while a low oven works well when reheating several rolls at once. Avoid overheating them. Too much heat can dry the dough and turn the soft center chewy.
Nutrition Information:
Yield: 4 Serving Size: 1Amount Per Serving: Calories: 410
Frequently Asked Questions
What is a Mama Llama Bakery cinnamon roll?
A Mama Llama-style cinnamon roll is a soft, generously filled bakery-style cinnamon roll characterized by a tender dough, prominent cinnamon-brown sugar layers, a gooey center, caramelized bottom, and creamy glaze. This recipe recreates those characteristics in a home-baked version.
What makes cinnamon rolls soft instead of dense?
Soft cinnamon rolls depend on proper flour quantity, gluten development, adequate proofing, and careful baking. Adding too much flour is a common cause of dense rolls because it produces a stiff dough with less moisture.
Why is my cinnamon roll dough sticky?
A little stickiness is normal for a soft cinnamon roll dough. The dough should become smoother and more elastic as it is kneaded. Add reserved flour gradually only if the dough is too loose to develop structure.
Why do my cinnamon rolls spring back when I roll them?
The gluten may be too tight. Cover the dough and let it rest for 5–10 minutes before rolling again. The rest allows the gluten to relax and makes the dough easier to stretch.
How long should cinnamon rolls proof after shaping?
This recipe generally calls for 25–30 minutes of final proofing, but the dough’s appearance matters more than the exact clock time. The shaped rolls should look noticeably puffed before they go into the oven.
Why do cinnamon rolls have a caramelized bottom?
A caramel bottom comes from baking the rolls over a mixture of butter, brown sugar, and maple syrup. As the mixture heats, the sugar and butter combine into a sticky, deeply flavored layer underneath the rolls.
Should cinnamon rolls be glazed while hot?
They should be warm rather than piping hot. A short cooling period keeps the glaze from completely disappearing while still allowing it to melt into the cinnamon-roll layers.
Can I make cinnamon rolls the night before?
Yes. You can prepare them ahead and refrigerate them, then allow the dough to come toward room temperature and finish proofing before baking. The final proof should be judged by how puffy the rolls look rather than by a fixed time.
Why did my cinnamon roll filling leak out?
Filling can leak when the dough is rolled too loosely, the butter is too melted, or the filling is pushed beyond the edges. Use softened rather than liquid butter and roll the dough firmly enough to create defined layers.
How do I keep cinnamon rolls from drying out?
Avoid excess flour and overbaking, and store finished rolls in an airtight container. When reheating, use gentle heat and stop as soon as the center is warm.
For me, the best part of this Mama Llama Bakery Cinnamon Roll Recipe is the contrast between the different textures. The outside has that beautiful baked, caramelized finish, the middle stays soft and tender, the cinnamon-brown sugar filling becomes wonderfully gooey, and the warm vanilla glaze ties everything together.
The biggest secret isn’t one special ingredient. It is the way you handle the dough.
Keep it soft. Don’t bury it in flour. Add the butter gradually. Give the dough time to relax. Let the shaped rolls become properly puffy before baking. Then use the two-stage bake and finish the rolls with glaze while they’re still warm.
Those little details are what turn an ordinary homemade cinnamon roll into the kind of soft, gooey, bakery-style cinnamon roll that makes everyone reach for the center piece first.
Additionally, You can also like and, follow us on Pinterest, and YouTube for more updates. Your thoughts and engagement are greatly appreciated!